WooCommerce is a free plugin to expand your WordPress blog to a full-fledged e-shop. It is a very customizable and extensible framework and does not require coding or technical expertise for you to get started with a simple e-shop.
Products are added through the same interface you use to add blog posts; the base installation is theme-agnostic, but it also supports a multitude of themes; payment methods are integrated and easy to add. On the whole, WooCommerce is an all-in-one solution for e-commerce in WordPress based websites.
You may have already noticed, but we provide a vast collection of WooCommerce tutorials, that address specific problems and suggest solutions. This guide is addressed more to the new user, and reviews all the steps to install WooCommerce for the first time, configure it and add your products.
If you don’t yet have a hosting for your WordPress/WooCommerce website, we recommend WP Engine
Why use WooCommerce
- It is a 100% free plugin, very easy to use, actively developed and stable.
In fact, WooCommerce, as well as WooThemes have been bought by Automattic, the company behind WordPress in 2015. This alone speaks tons about the stability of the plugin. It is also a guarantee that, for as long as WordPress exists, WooCommerce will be fully compatible.
- Tons of themes!
Just check WooThemes, to find free and premium themes developed by the WooCommerce team. Or have a look at the WordPress themes directory. Also, many premium themes by Themeforest support WooCommerce integration, including the best-selling WordPress themes Avada, Enfold and X | The Theme.
- Very extensible.
There are plenty of plugins to extend WooCommerce. A great selection of free plugins also exists in the WP plugin directory.Codecanyon offers many multipurpose plugins that are 100% integrated with WordPress
- Many developers specialize in WooCommerce.
Just like WordPress itself, there are many coders and web developers, that specialize in WooCommerce. If you have a more complex issue, that you cannot solve alone, or even if you don’t want at all to mess with your WP installation and prefer someone else to do it for you, finding an affordable and very knowledgeable developer will be very easy.
Getting started
Installing WooCommerce requires nothing more than logging into your WordPress installation, search the plugin in the Plugins -> Add New search form and then install/activate it.
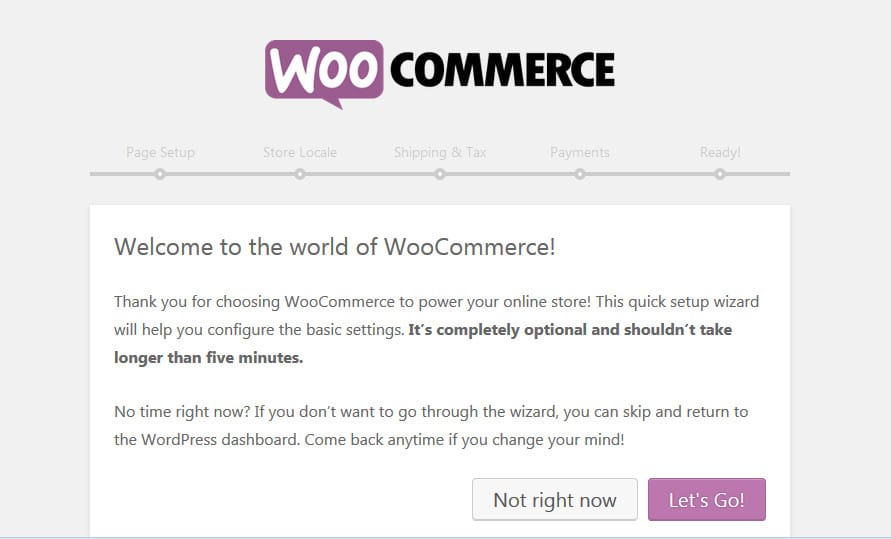
Upon activating the plugin, you are redirected to a wizard that will help you configure your initial settings. I suggest you let the wizard walk you through the basic configuration options. So, let’s click on “Let’s go” and get started.
Pages Setup.
In this screen, the Wizard informs you about the essential pages that must be created for your store. Those pages are:
- Shop: This is the main page of your e-shop, where your users can browser your products
- Cart: This is the page where your customers can view their cart after they have made some purchases. It contains the shortcode
[woocommerce_cart], that displays the cart contents. - Checkout: In this page, your customers can confirm their purchases. With the shortcode
[woocommerce_checkout], the page displays information about shipment and payment options. - My Account: Contains the shortcode
[woocommerce_my_account]; it enables users that have registered in the past to view their past orders, as well as information about their account.
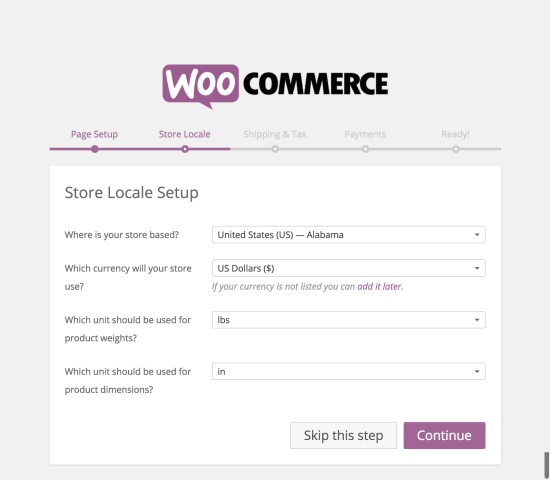
Store Locale setup
The following section allows you to setup the location of your store. Also, here you will set your currency and the weight and dimension units your store will use.
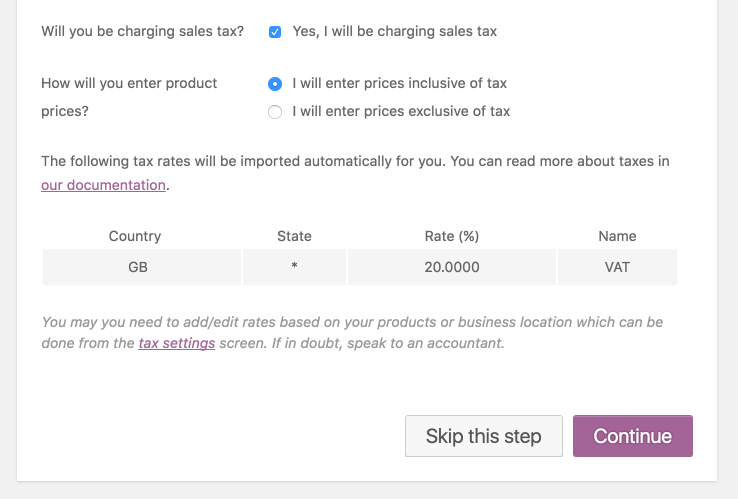
Enabling shipping and tax.
If you want to ship physical products to the customer’s location, here is where you will configure it.
Also, you can enable the possibility to charge sales tax for your products; in this case, more options will appear, allowing you to configure the tax rate of your country and whether your prices include tax or not.
Configure payments.
The next page of the Wizard, allows you to select and configure your payment options. The Wizard gives you the choice to setup two of the most popular payment options, PayPal or Stripe.
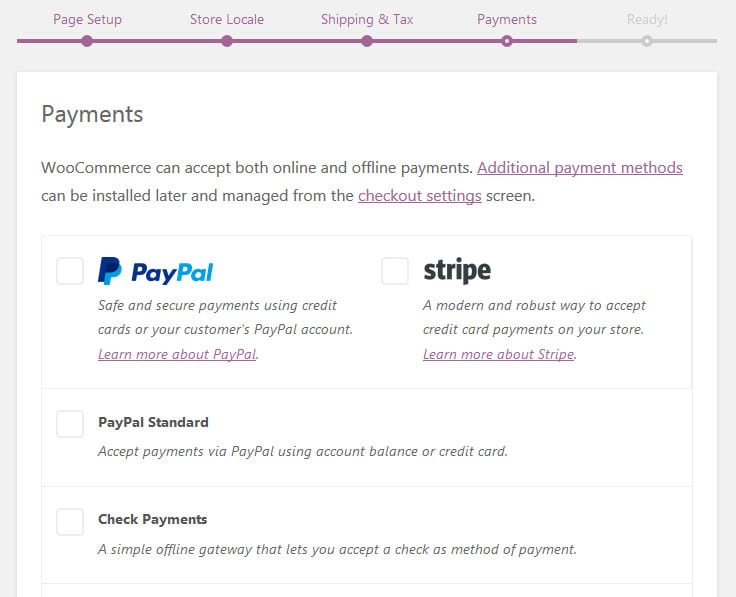
You can also select other payments methods, such as payment by check, bank transfer or cash on delivery.
Creating products.
With this, you have reached the last screen of this Wizard and you are asked to decide whether you want to create your first product already.
The New Product page
The Product page (also can be found on the dashboard, under Products -> Add Product), on first glance looks very similar to the “Add New Post” page. The first text box is the name of the product, as it should be displayed on the page. Much like the “New Post” page, once you add the title, the permalink appears, giving you the option to change the slug.
Next, in the text area you input the long product description. As you are creating the product’s own page, you should be as detailed as you want to in your description.
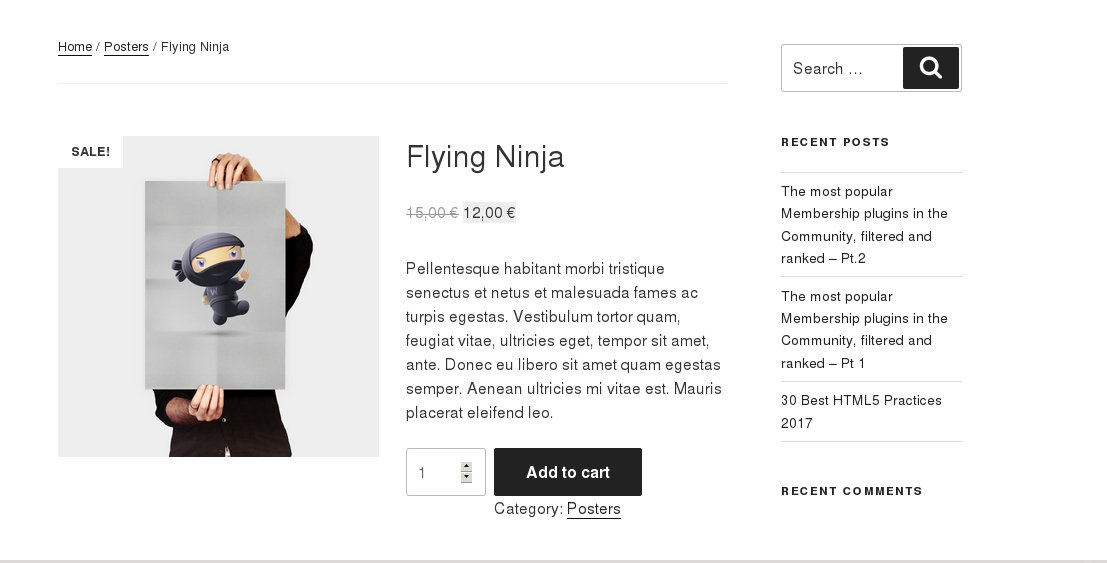
Adding a screenshot for your product.
You can add a picture for your product, as well as a gallery of images that the customer can browse through.
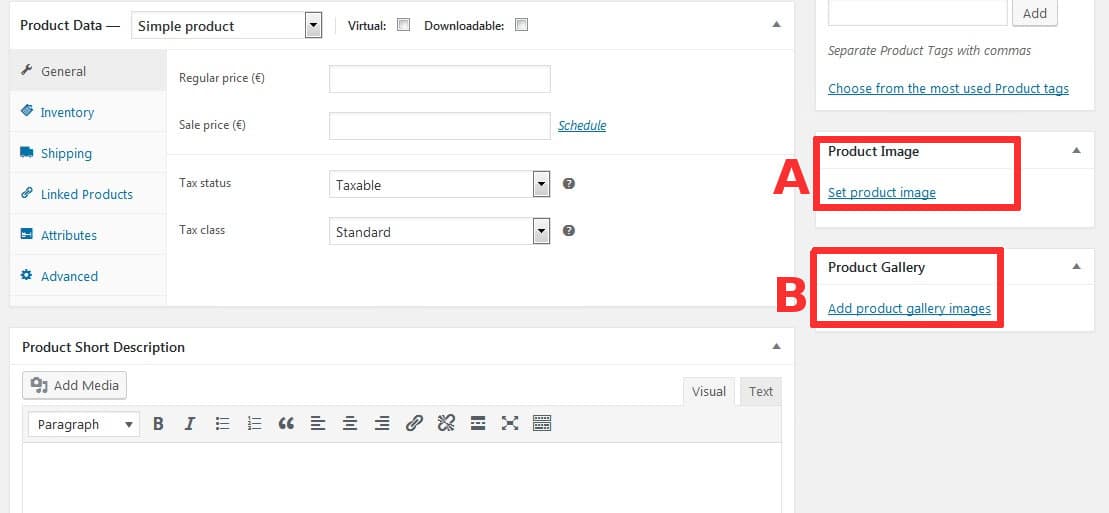
In the above screenshot, you can see the lower part of the new product page. To add a product image, go to (A) – Product Image and select or upload an image from your media library. This picture will be displayed on your shop, as well as on the products details page.
To add more pictures for the same product, just click on (B) – Product Gallery and add as many pictures as you want. They will be displayed in the single product page as a gallery.
Removing Product reviews.
In the case that you don’t want your users to review your products, you can easily remove the “Review” tab from the product page. We already mentioned that the New Product page uses the same logic as a Post page. In this case, the reviews are post comments. All you need to do is to disable comments for this product, and the review tab will not be visible for this product.
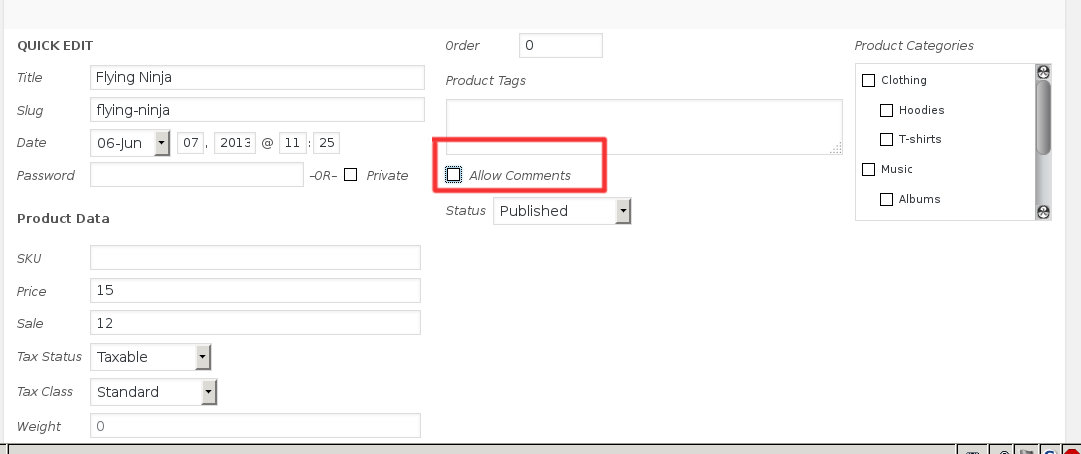
For this, go to Products -> Quick Edit and untick the “Allow Comments” option.
Product data
Here you can add the most important data for your products, such as price, inventory information, dimensions and other shipping options and more. Please see the official WooCommerce documentation for a detailed description of every option. For the purposes of this guide, let us only mention a few options that might seem non-intuitive for the first time user:
SKU
SKU stands for Stock Keep Unit and it takes the role of a unique ID for each product. For that, it must be formatted in such a way that it cannot overlap with the posts’ IDs (ex., using a code beginning with a letter).
SKU is very important for stock management and for products tracking purposes. In fact, it is a good idea to add the SKU code in the product’s URL and enable search by SKU. This functionality will help the store manager to keep better track of the products inventory.
Also, please refer to this article to see how to automate adding SKU codes for all products in your store
Shipping
Shipping section seems pretty straight-forward, however it does not offer too many customization options. Your shipping carrier might offer you options that are not included in the default; or you might reward your customers with free shipping if they order over a certain price.
Please see this guide on how to offer different shipping methods depending on cart total.
Regarding free shipping, there is one more thing to keep in mind: WooCommerce allows to set free shipping for all orders or only for orders over a certain amount. To further customize free shipping, we recommend the WooCommerce Advanced Free Shipping plugin. Please see our tutorial for more details.
Extending WooCommerce
As we already mentioned, one of the greatest things about WooCommerce, is how extensible and versatile it is. The WordPress community has created a huge number of amazing themes and plugins that allow you to customize or add functionalities to your e-shop.
Theming WooCommerce
WooCommerce is designed to be theme-agnostic; the content is laid out with standard WP classes, so that any theme will display WooCommerce with the theme’s own styles.
However there are many themes that have been designed specifically to produce visually amazing WooCommerce e-stores.
- The first we should mention here, is the Storefront theme, created by the WooCommerce core developers and based on the Underscores starters theme by Automattic; that alone guarantees a stable, secure theme with excellent integration with WooCommerce
- Then, all the Twenty-something theme series from Automattic, that gets shipped by default with WordPress, is designed for a seamless WooCommerce integration, since, at least the Twenty Ten theme, published on 2010. The new default WordPress theme, Twenty Seventeen, plays very nicely with WooCommerce.
- The huge popularity of WooCommerce, has made most commercial themes as well as many free ones to take WooCommerce markup into consideration. Many free themes specifically metion WooCommerce integration, for example, Total and OnePress. Many more themes were made for WooCommerce, such as Giga Store and Shop Isle. In fact, you will be hard-pressed to find a theme that does not play nicely with WooCommerce; especially paid/premium themes usually have excellent support.
Extensions
You can find the recommended, free and premium plugins, in your dashboard: WooCommerce -> Extensions.
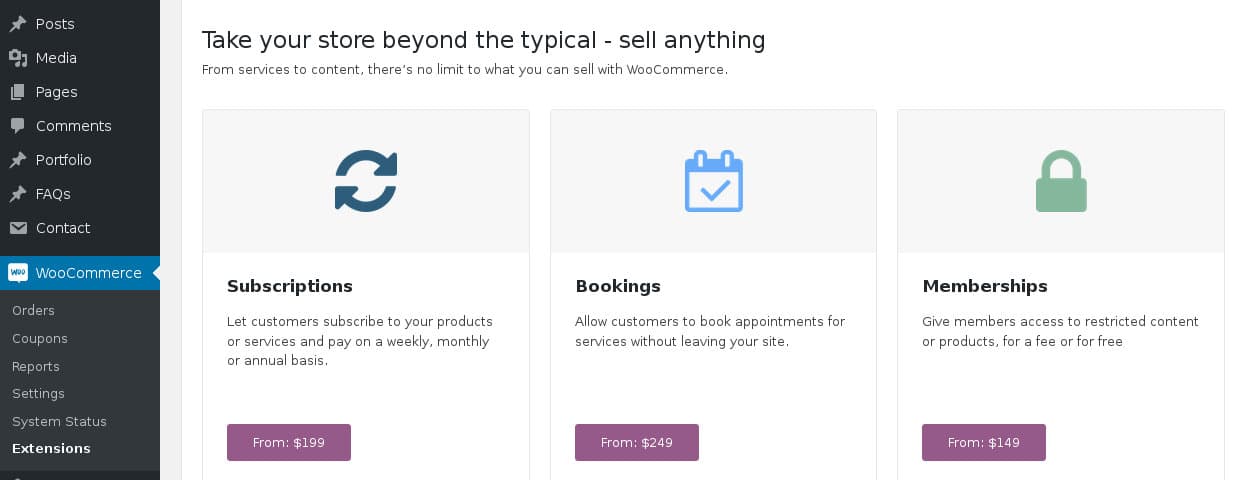
In the first tab (Featured) you will see several paid plugins. However there are many more free plugins in the other tabs that can add incredible functionality to your e-store. A multitude of payment methods (Stripe, Amazon, PayFast), shipping options and more are available for free through the WooCommerce products page.
Some extensions that might be of interest:
- Woocommerce Login / Signup Lite, to allow a registration process for your customers.
- Pay with Stripe and Pay with Amazon.As well as many more payment options
- WooCommerce Google Analytics Integration, for a perfect integration of your e-shop with Google Analytics.
- WooCommerce Product Slider, to showcase your products with a responsive carousel.
- WooCommerce Currency Switcher, to allow your customers covert rates in real time.
- MailChimp for WordPress. This is a WP plugin with a seamless integration with WooCommerce that will allow your customers to sign up for your MailChimp lists
We believe we have covered the basic steps to get started with Woocommerce. Please use the search bar, or see our previous posts in WooCommerce category for more tips and tricks regarding customizing your e-shop.