By default, the WooCommerce registration form on the My Account page only asks for an email address and password. While this keeps registration fast, many store owners need additional information like first name, last name, and phone number to personalize the shopping experience and streamline checkout.
In this tutorial, we’ll show you how to add custom fields to the WooCommerce registration form using PHP code. We’ll cover adding the fields, validating them, and saving the data to the database. If you prefer a no-code solution, check out our WooCommerce Checkout & Register Form Editor plugin.
Step 1: Enable Registration on the My Account Page
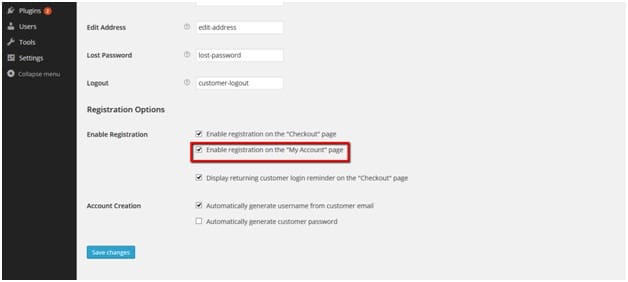
First, make sure registration is enabled. Go to WooCommerce → Settings → Accounts & Privacy and check the box for “Enable registration on the My Account page”:
Step 2: Add Custom Fields to the Registration Form
Add the following code to your child theme’s functions.php file. This adds first name, last name, and phone fields:
function wooc_extra_register_fields() {
?>
<p class="form-row form-row-first">
<label for="reg_billing_first_name">
<?php _e('First name','woocommerce'); ?>
<span class="required">*</span>
</label>
<input type="text" class="input-text"
name="billing_first_name"
id="reg_billing_first_name"
value="<?php if(!empty($_POST
['billing_first_name']))
esc_attr_e($_POST
['billing_first_name']); ?>" />
</p>
<p class="form-row form-row-last">
<label for="reg_billing_last_name">
<?php _e('Last name','woocommerce'); ?>
<span class="required">*</span>
</label>
<input type="text" class="input-text"
name="billing_last_name"
id="reg_billing_last_name"
value="<?php if(!empty($_POST
['billing_last_name']))
esc_attr_e($_POST
['billing_last_name']); ?>" />
</p>
<div class="clear"></div>
<p class="form-row form-row-wide">
<label for="reg_billing_phone">
<?php _e('Phone','woocommerce'); ?>
<span class="required">*</span>
</label>
<input type="text" class="input-text"
name="billing_phone"
id="reg_billing_phone"
value="<?php if(!empty($_POST
['billing_phone']))
esc_attr_e($_POST
['billing_phone']); ?>" />
</p>
<?php
}
add_action('woocommerce_register_form_start',
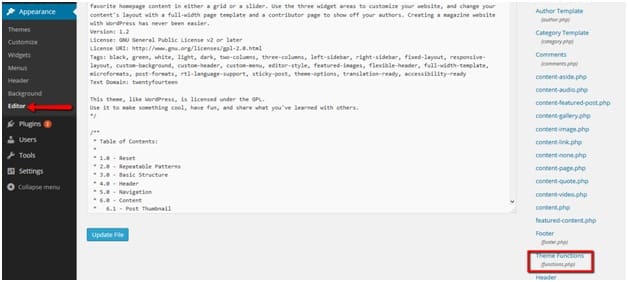
'wooc_extra_register_fields');Access functions.php via Appearance → Editor → Theme Functions:
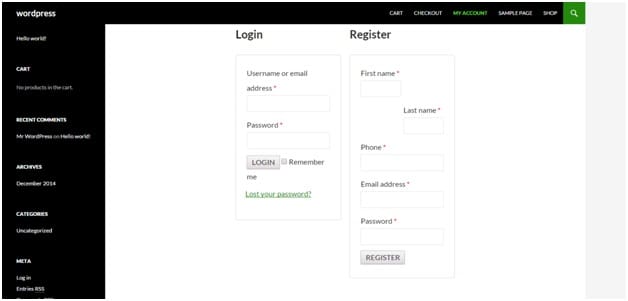
After saving, the registration form now shows the custom fields:
Step 3: Add Validation for the Custom Fields
To prevent users from submitting empty required fields, add this validation code to functions.php:
function wooc_validate_extra_register_fields(
  $username, $email, $validation_errors
) {
  if ( isset($_POST['billing_first_name'])
    && empty($_POST['billing_first_name']) ) {
    $validation_errors->add(
      'billing_first_name_error',
      __('<strong>Error</strong>:
        First name is required!',
        'woocommerce')
    );
  }
  if ( isset($_POST['billing_last_name'])
    && empty($_POST['billing_last_name']) ) {
    $validation_errors->add(
      'billing_last_name_error',
      __('<strong>Error</strong>:
        Last name is required!',
        'woocommerce')
    );
  }
  if ( isset($_POST['billing_phone'])
    && empty($_POST['billing_phone']) ) {
    $validation_errors->add(
      'billing_phone_error',
      __('<strong>Error</strong>:
        Phone is required!',
        'woocommerce')
    );
  }
}
add_action('woocommerce_register_post',
  'wooc_validate_extra_register_fields',10,3);
If a required field is left empty, the user sees a validation error:

Step 4: Save the Field Values to the Database
Finally, add this code to save the custom field values as user meta and WooCommerce billing data:
function wooc_save_extra_register_fields(
$customer_id
) {
if ( isset($_POST['billing_first_name']) ) {
update_user_meta( $customer_id,
'first_name',
sanitize_text_field(
$_POST['billing_first_name'] ) );
update_user_meta( $customer_id,
'billing_first_name',
sanitize_text_field(
$_POST['billing_first_name'] ) );
}
if ( isset($_POST['billing_last_name']) ) {
update_user_meta( $customer_id,
'last_name',
sanitize_text_field(
$_POST['billing_last_name'] ) );
update_user_meta( $customer_id,
'billing_last_name',
sanitize_text_field(
$_POST['billing_last_name'] ) );
}
if ( isset($_POST['billing_phone']) ) {
update_user_meta( $customer_id,
'billing_phone',
sanitize_text_field(
$_POST['billing_phone'] ) );
}
}
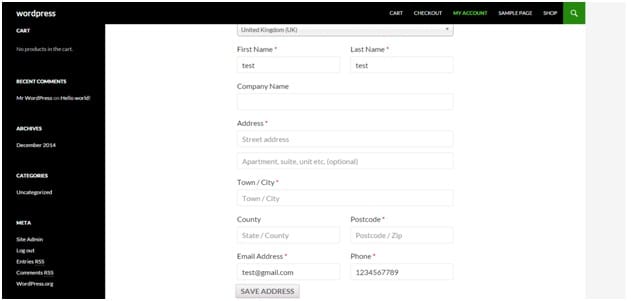
add_action('woocommerce_created_customer',
'wooc_save_extra_register_fields');Once a user registers, the billing address section on their My Account page is automatically populated with the data they entered:
Why the billing_ Prefix Matters
The field names use the billing_ prefix to associate them with WooCommerce’s built-in billing address system. This means the data entered during registration automatically pre-fills the billing fields at checkout — so customers don’t have to type the same information twice.
Other valid billing fields you can add include: billing_company, billing_address_1, billing_address_2, billing_city, billing_postcode, billing_country, and billing_state.
Conclusion
Adding custom fields to the WooCommerce registration form is a three-part process: display the fields, validate the input, and save the data. With the billing_ prefix, the information automatically pre-fills at checkout, creating a smoother experience for your customers. For a no-code alternative, try our Checkout & Register Form Editor plugin.
Frequently Asked Questions
Q: Can I add these fields without writing code?
Yes. Our WooCommerce Checkout & Register Form Editor plugin lets you add, remove, and rearrange registration fields from the admin panel with no coding required.
Q: Will the custom fields show in the admin user profile?
Yes. Since we save the data using update_user_meta with standard WordPress and WooCommerce field names, the values appear in both the WordPress user profile and the WooCommerce customer billing details.
Q: Can I add dropdown or checkbox fields instead of text inputs?
Yes. Replace the <input type=”text”> with <select>, <input type=”checkbox”>, or any other HTML form element. Just make sure to update the validation and save functions accordingly.
Q: Will this survive theme and WooCommerce updates?
Yes, as long as the code is in a child theme’s functions.php. The hooks used (woocommerce_register_form_start, woocommerce_register_post, woocommerce_created_customer) are stable WooCommerce API hooks.