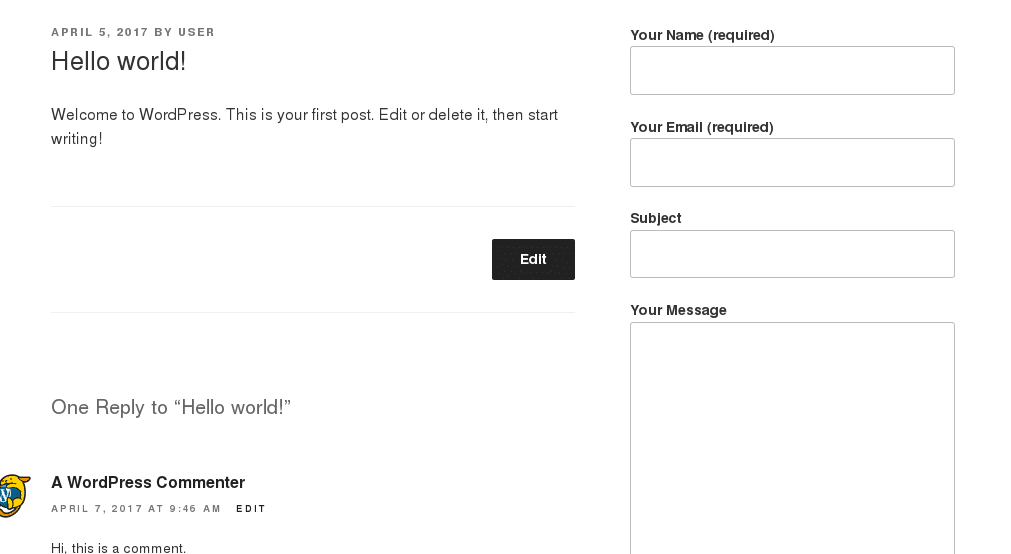
Contact Form 7 (CF7) is one of the most popular contact form plugins for WordPress, with over 3 million active installs – and with very good reason! It is a free, easy to use plugin that just works. Installing and activating CF7 is all you need to do to get a simple contact form:
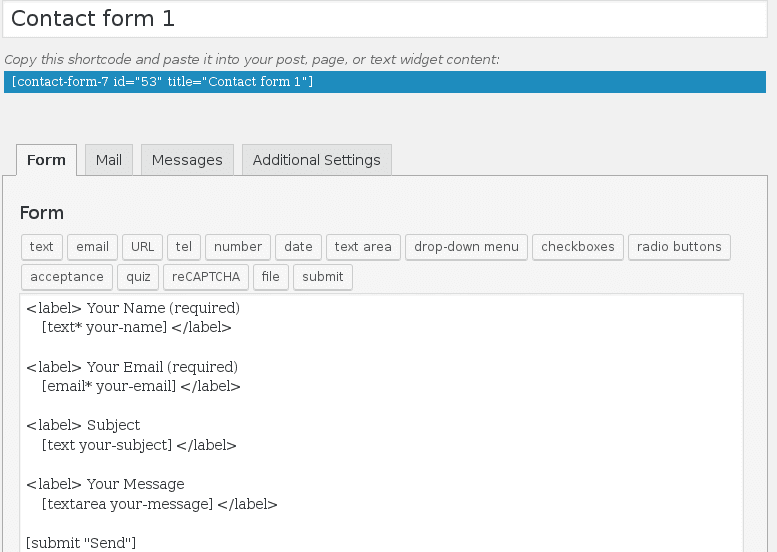
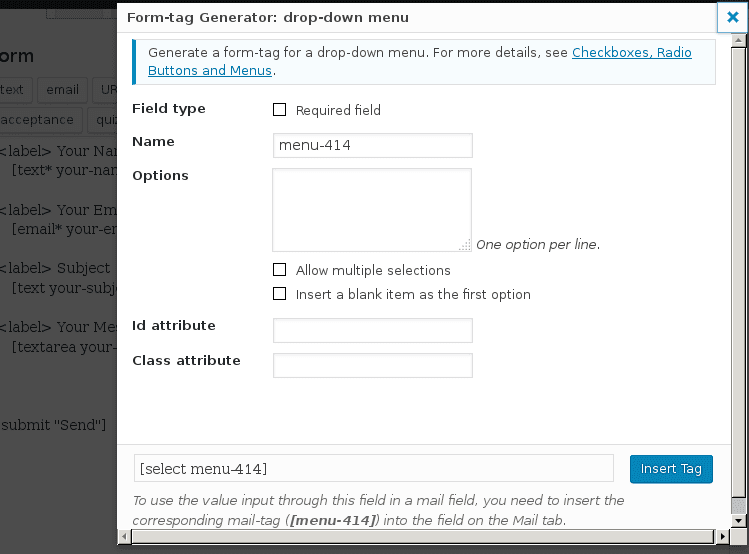
By simply pasting the shortcode on any page, you already have your first contact form. In the second screenshot, you can see that you can edit the labels of the fields, the placeholder text, or add new fields, using the handy generator. For example, if you wanted to add a drop-down menu, you would see the following screen:
It is about as easy as it gets. The documentation covers pretty much everything Contact Form 7 can do and includes many pointers for more advanced uses, integration with plugins such as Akismet (for spam filtering), Google Analytics, reCAPTCHA, and more.
Filtering out spam
Contact forms, however, much like any element in your website that allows user input, will very soon become magnets for spam. CF7 has some built-in features that can help minimize spam form submissions:
reCAPTCHA and Quiz
reCAPTCHA needs no introduction; most of us have had to solve one or two, at one point or another. You need a Google account and you will have to register your site, to obtain an API key pair.
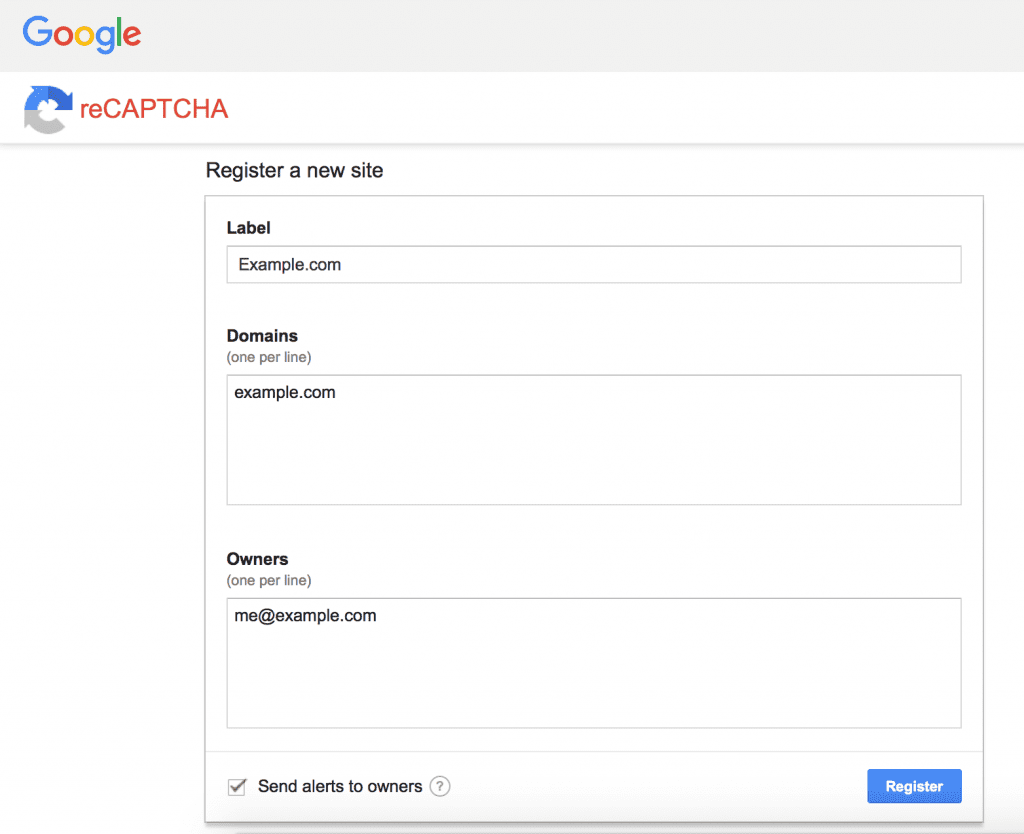
You will then have to configure the obtained keys in “Contact > Integration > reCAPTCHA”; once done, you can add the reCAPTCHA form tag into your form.
I personally dislike reCAPTCHAs. I find them time-wasting and annoying and, honestly, I think of them as poor user experience. The legitimate user should not have to prove that they are not a bot – instead the bot should have to prove that they are, actually, human.
The “Quiz” option offered, has a similar logic, that the user has to prove that he’s not a bot. Personally, I’d prefer this over a reCAPTCHA, for the reason that if your questions are really simple, the human user will be able to answer them in a matter of seconds. Here is how it works: you type pairs of questions – answers, separated by a |. If you type more than one questions (one per line), one is going to be randomly selected each time.
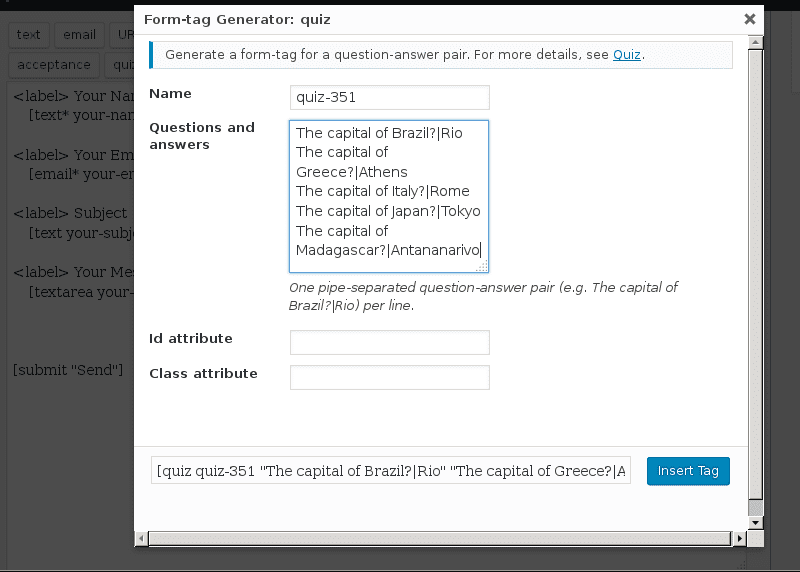
Here is the generated shortcode:
[quiz quiz-351 "The capital of Brazil?|Rio" "The capital of Greece?|Athens" "The capital of Italy?|Rome" "The capital of Japan?|Tokyo" "The capital of Madagascar?|Antananarivo"]The first Q-A pair (“The capital of Brazil?|Rio”)is actually given as an example on the CF7 quiz generator. So, if you use this question, and your frustrated users cannot reach you, cause they keep typing the actual capital of Brazil, Brasília, please do not blame this article.
Integration with anti-spam plugins
Contact Form 7 offers an out-of-the-box integration with Akismet. You can find a detailed guide on how to add Akismet spam protection in your form in Contact Form 7 documentation. By appending the shortcodes with Akismet options (ex. [email* your-email akismet:author_email]), all user data is compared to the Akismet databases and spam submission will fail.
Other spam protection solutions
Takayuki Miyoshi, the developer of Contact Form 7, has also created a simple CAPTCHA plugin, Really Simple CAPTCHA. It creates a random 4 characters code that the user has to input in a textbox. Compared to Google’s reCAPTCHA, it is simplistic and not as secure; however, simple might just be what you need for a small site with a very simple contact form.
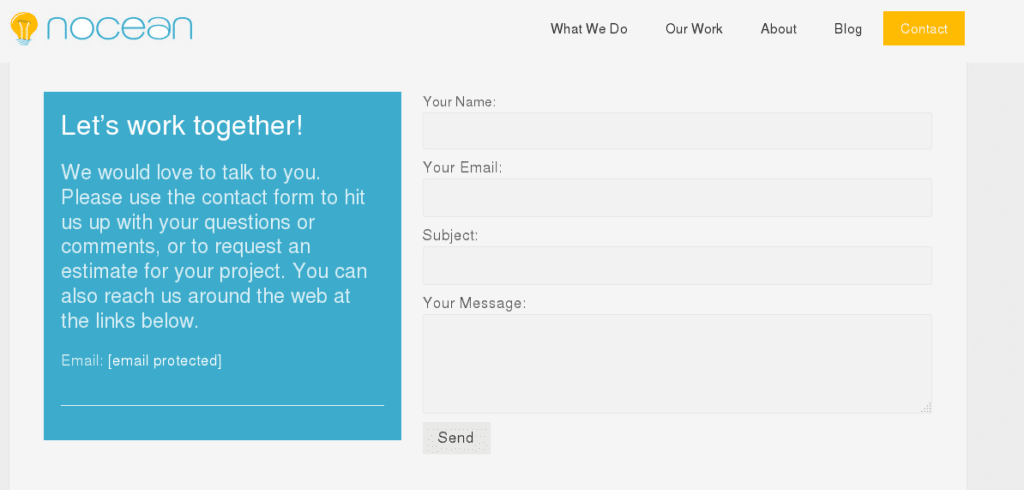
Contact Form 7 Honeypot is another plugin that takes a different approach: it creates a form field that is hidden by CSS. The legitimate user, browsing with a legitimate browser, will see a simple contact form, like the one in the following screenshot, from the plugin developer’s site:
However, a bot, will reach the URL from a text browser, very similar to the native Linux browser Lynx. Here is what the form now looks like (note the additional text area):
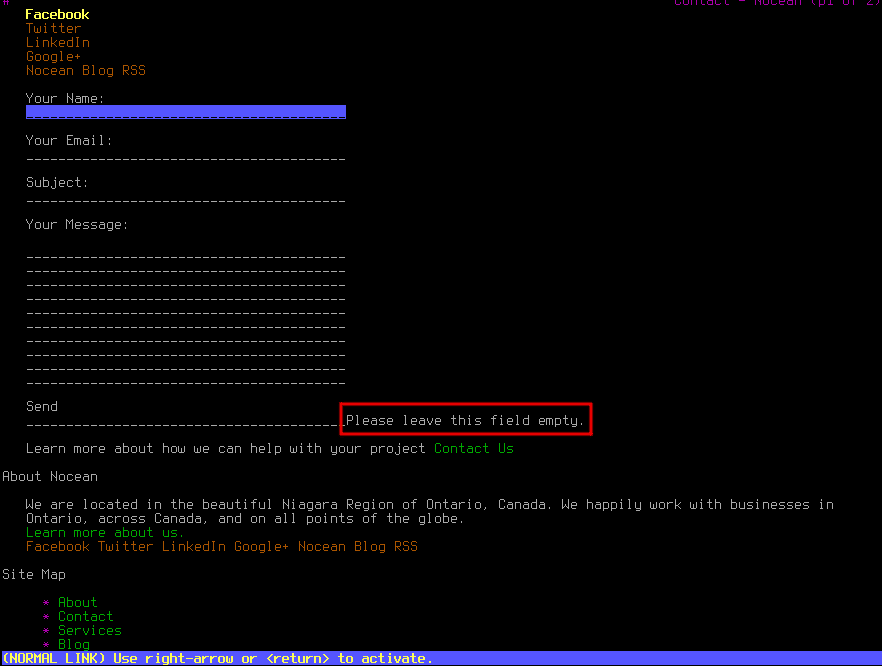
The bot will fill the additional text area, which will then flag the form submission as spam.
Embedding Contact Form 7 in a widget or in a template file
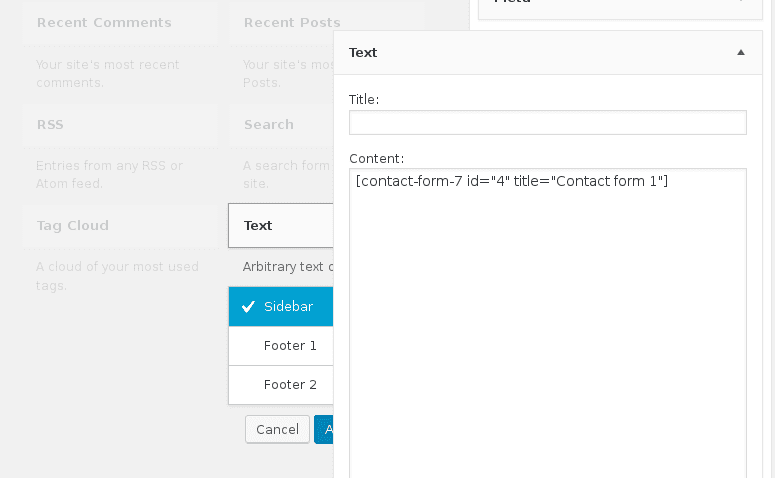
Many plugins create shortcodes that cannot be out-of-the-box, placed in a widget. However, this is not the case with CF7. Simply adding the generated form shortcode in a text-widget is all you need to do:
If you want to create a template file and embed a contact form in there, this is also easy to accomplish, using the function do_shortcode(). Simply add this line in your template file:
<?php echo do_shortcode( '[contact-form-7 id="4" title="Contact form 1"]' ); ?>Set up popups with Contact Form 7
Many people hate popups (myself included) but there is no doubt that they have their uses. Maybe you want to show a popup to the user once the form is submitted. Maybe you want your whole contact form to be displayed as a popup. Maybe you want to integrate optins. Here is what to do:
Display popup once the user submits a form
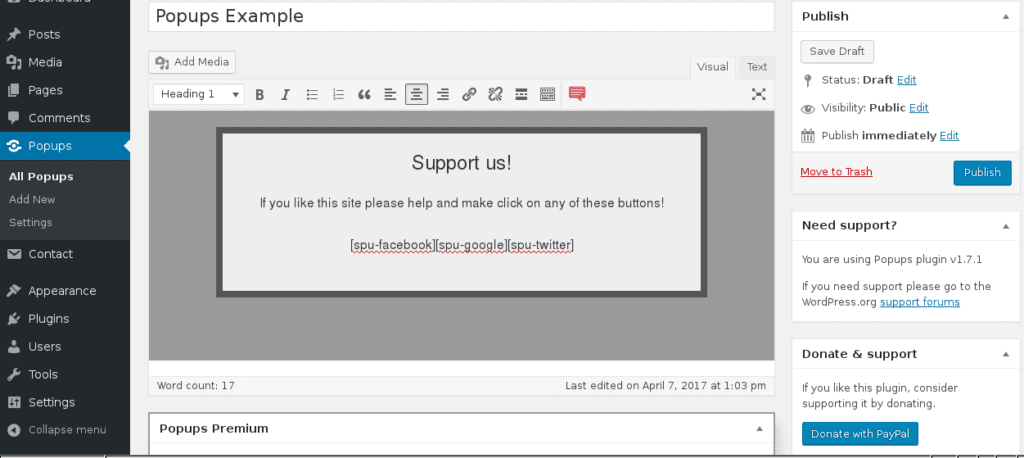
We will use another plugin, aptly named: Popups, by Damian Logghe. Once activated, the plugin created a menu on the dashboard, from where you can select “Add New”. You will see a draft popup created, that allows users to reach you in some social media:
If we scroll down, past the list of premium features and the example shortcodes, we will find a section called: “PopUp Display Rules”. Here you can choose a number of scenarios to display the popup. For the sake of brevity, let’s create a rule that makes the popup show only if page is equal to Contact Page.

Right below this section the display options are located. The most important options here are the “Trigger action” and the “Conversion cookie” time. Trigger action is by default set to 5 seconds after page load – we want to change this to “Manual Triggering”, as the popup should only appear once the user has successfully submitted the form. The “Conversion cookie” displays a numerical value in seconds which represents how long before the popup reappears to the user. I strongly suggest, for all your popups, to input a high value – nothing chases users faster away from your website, than popups constantly appearing.
Now we can go back to our contact form and add the following code on the “Additional Settings” tab:
on_sent_ok: "SPU.show(6);"The number 6 in the above code comes from the ID of the popup we want to display:
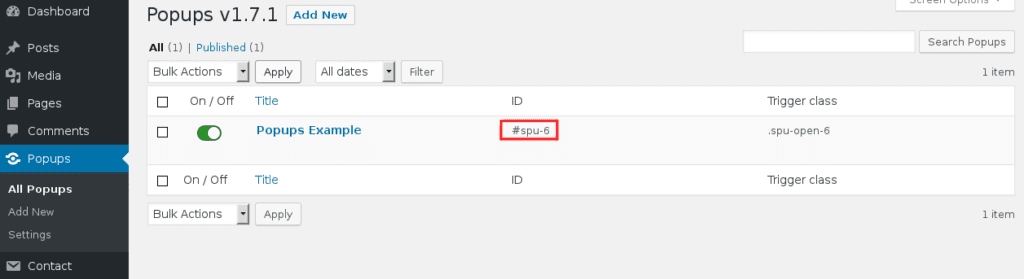
In your code you will have to substitute the number 6 with the number that comes after the #spu- part of the ID.
Have your contact form appear as a popup
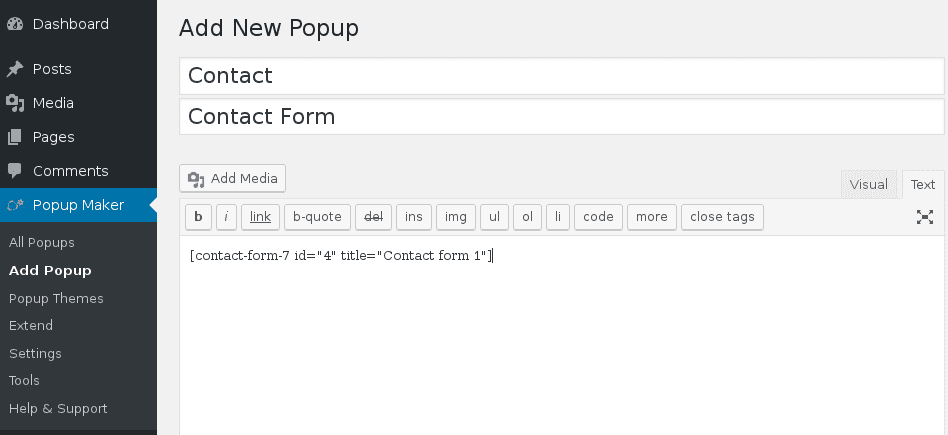
This can be done very easily, using the Popup Maker plugin. Popup Maker is pretty robust, with many options, including themes. Let’s ignore all this options for now, and go to the “Add New Popup” screen.
All you have to do here (after ensuring that you are in the text, and not the visual editor), is to paste the shortcode of your contact form:
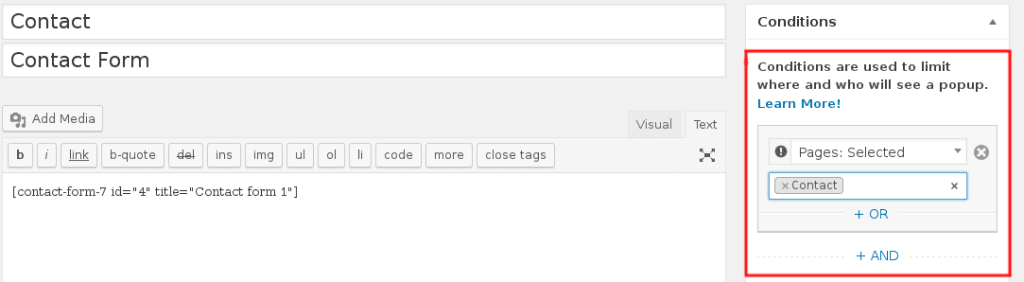
On the right part of the page, you can choose where you want your contact to display. I chose here “Contact” page.
And then, scrolling down, we can choose Triggers and Cookies, much like in the previous plugin. We will select here as a trigger “Click-Open”, which will show a popup that allows you to add custom CSS selectors (class and ID) for better styling, as well as to create our cookie. Let’s choose “Add New Cookie” action on the cookie tab (it is the only option at the moment, as we haven’t yet created any cookies). Then we are given further options for the cookie:
What will trigger your cookie to be created?
where we can choose “On Popup Open”, and then, we are presented with a screen that allows us to set our cookie.
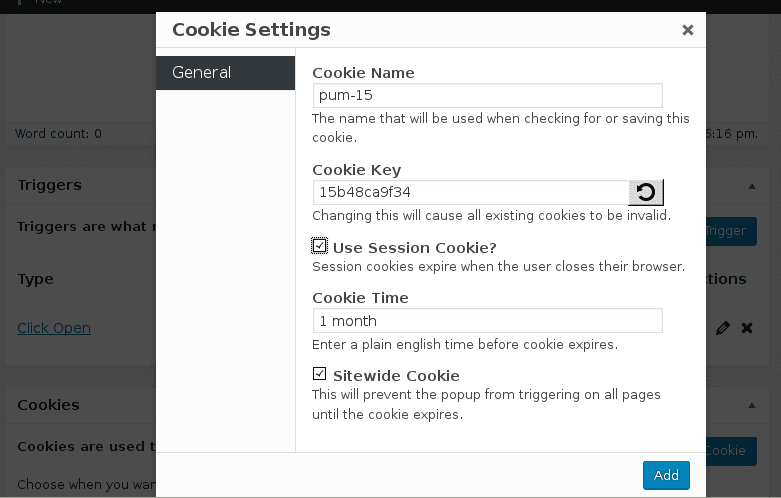
To create a cookie key, simply click on the “Refresh” button next to the Cookie key text area. I checked the “Use Session Cookie” option, so that the cookie will expire once the user closes their browser; however this is not particularly important.
And now let’s create the link that will allow the popup form to display. First of all, let’s see what classes are assigned to our new popup. This shows when we go to the “All Popups” screen:
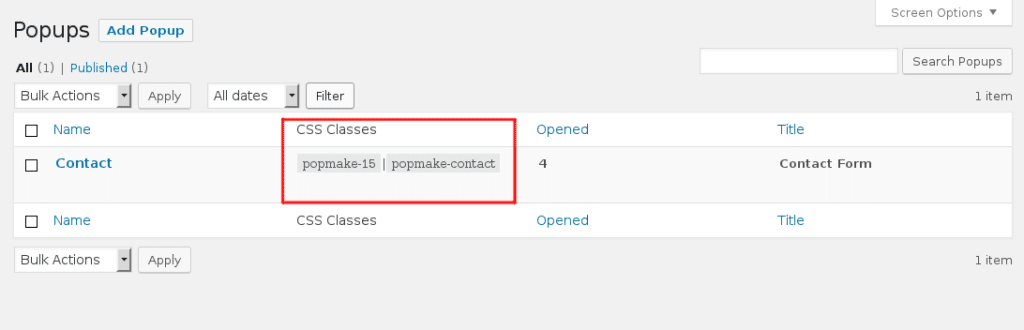
We will use these classes for the link in the Contact page:
<a href="#" class="popmake-contact popmake-15">Open contact form</a>And here is the final popup, with the “Hello” theme of Popup Maker:
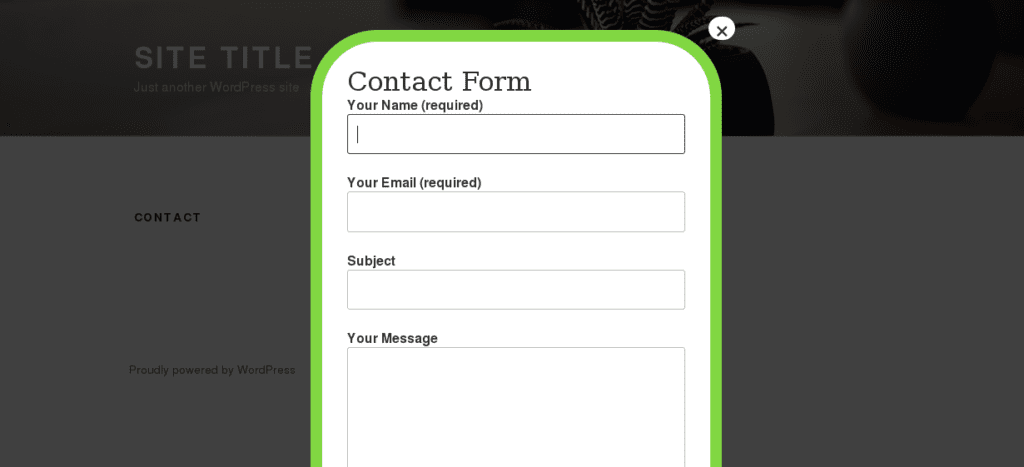
The above popup how-to’s both focused on a very basic use. However, using the same principles, you could extend the functionality of your contact form. Example uses include, give a download link to the user, once they have successfully filled the contact form, add a MailChimp sign up shortcode to anyone who contacts you, and more.
Contact Form 7 and multi-step forms
Several premium plugins support multi-step forms. While using a multi-step form doesn’t make sense if you just want the user to fill in their name and email and send you a message, in the case of a long, complex form, it is a good idea to break the form in multiple screens.
CF7 does not offer this option, however another free plugin, called Contact Form 7 Multi-Step Forms does, as you might have guessed, exactly this.
The first thing you have to do once you install this plugin is to plan your form. How many screens will you need? For each screen, create a new page or post and note down the URL – you will need it when you are creating your screens. For this example, we will create two posts for a two-screen form. The posts in this example are named “Contact Form Screen 1” and “Contact Form Screen 2”.
Then, let’s create a new CF7 form. You will see that there is a new button in the form builder called multistep. Once you click it, you are presented with this popup:
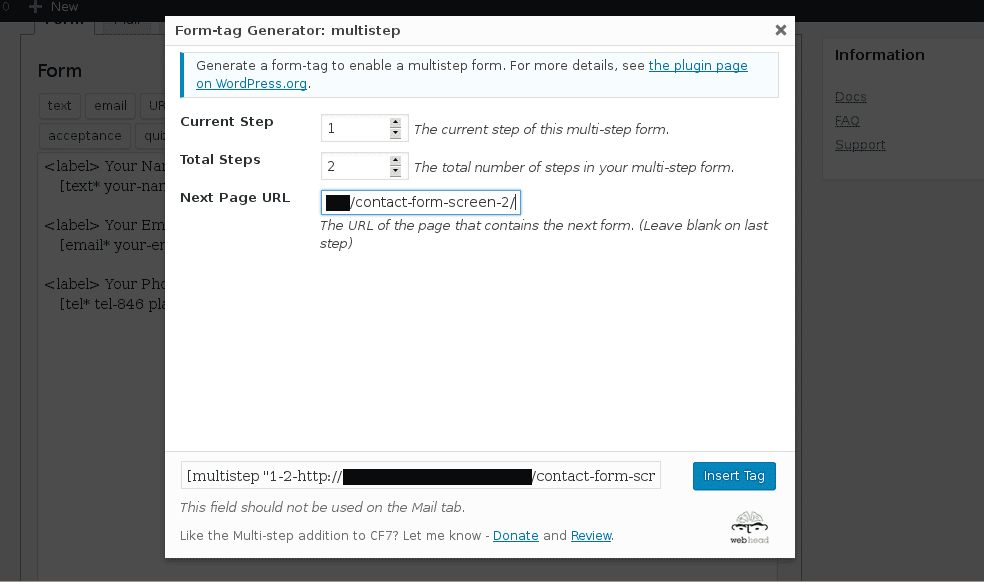
We will fill in the current step (1 of 2) and the URL of the post where we will add the second step. The tag generator will create a shortcode and insert it in the form builder page:
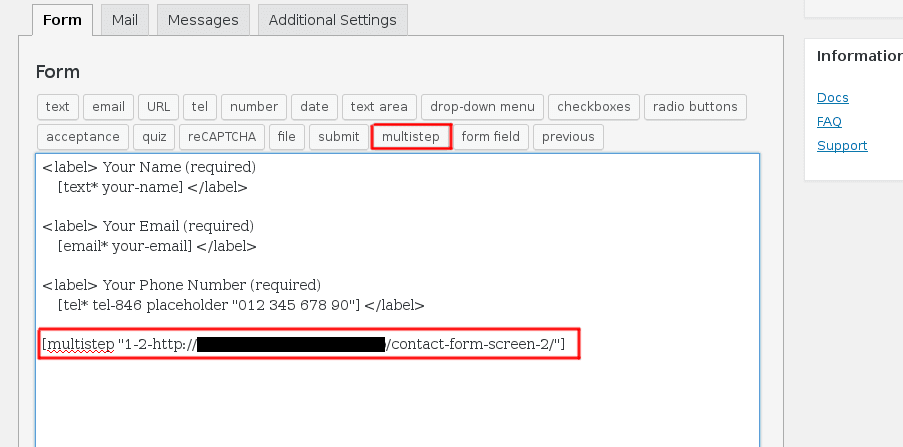
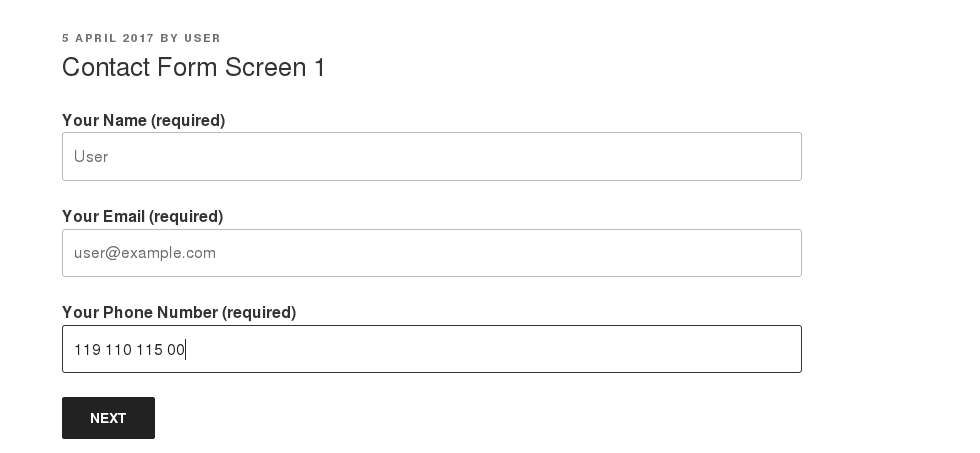
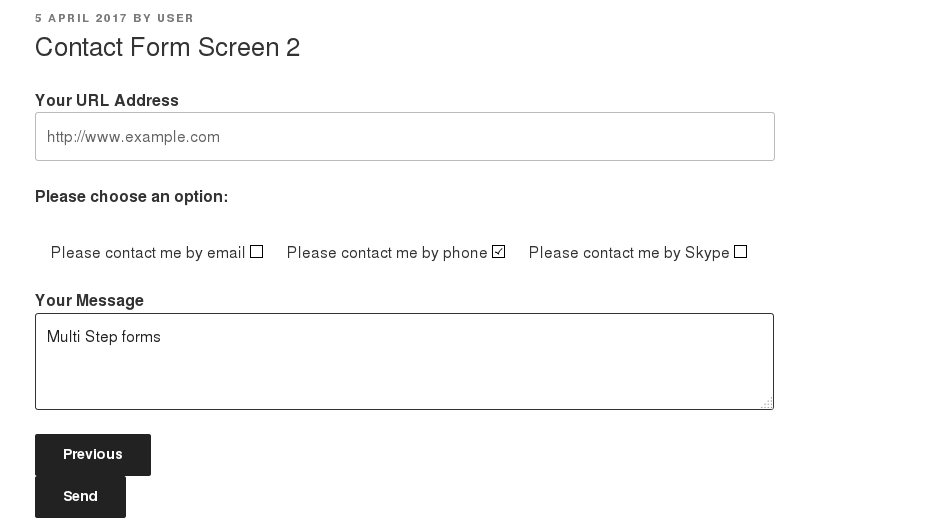
Let’s save the form and immediately paste the generated shortcode in the text editor of the “Contact Form Screen 1” post. Now we will repeat the exact same process with the second form; however this time, as it is our last screen, we will leave the “Next Page URL” empty.
And here is our multi-step form:
Save form data in database
One of the main characteristics of CF7 is that it emails you all form data. User submitted information is not stored anywhere. If your mail server malfunctions, you are in danger of losing form entries.
However, this is something that can be easily taken care of. There are a number of free plugins that work seamlessly with CF7 and give exactly this capability: to store form data in the database.
Flamingo
Takayuki Miyoshi, the developer of CF7, created an additional plugin that takes submitted form data and saves them in the database. The add-on is called Flamingo.
The use of Flamingo is pretty straight-forward (and the idea behind it is something that I, personally, appreciate very much: modularity, programs that do one thing and do it well). Flamingo, together with CF7, give a more complete solution, that allows your users to contact you through your contact form, and you to receive their messages in both your email, as well as your WordPress dashboard – also with the opportunity to export all form data to Excel or CSV.
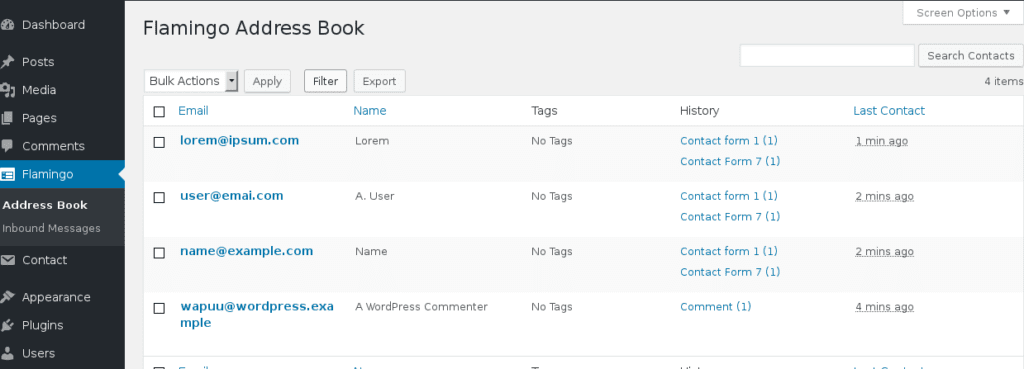
Flamingo works out of the box and does not disappoint. It creates an address book from, not only the emails of those who contacted you via CF7, but also of those who used the comments section to reach you.
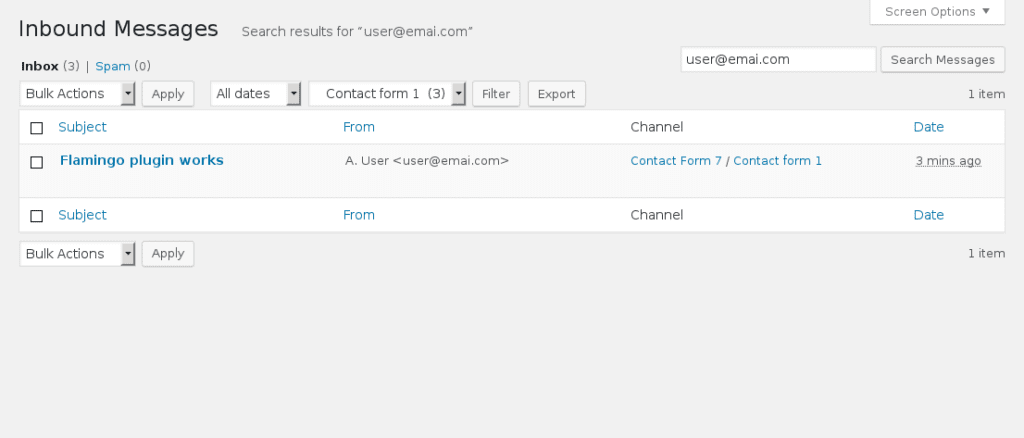
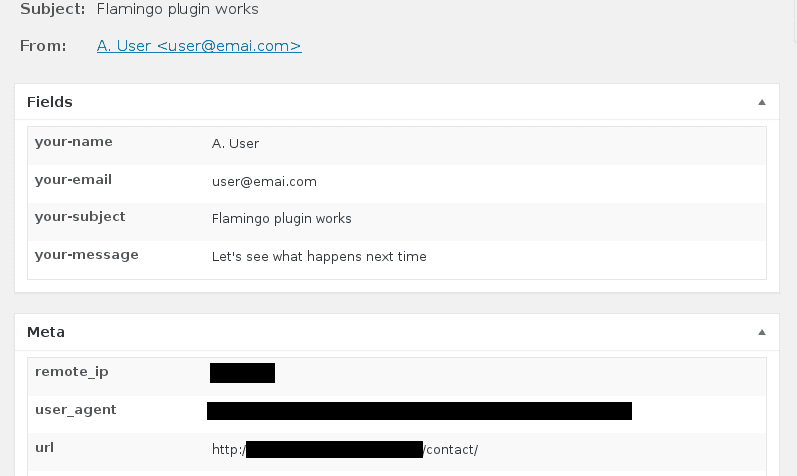
If you click on any of the “History” links in your address book, you will get detailed information of the sender – by further clicking the “Subject” of the message, you can see all sort of additional information, such as the IP of the user, the user agent string, the URL address from which they reached you, and more.
CFDB plugin
CFDB (Contact Form Database) is a plugin that got, a couple months ago, pulled off the WordPress plugin directory. The short story is that, there was a security concern in the plugin. The plugin got de-listed and the developer got contacted. The developer, Michael Simpson, fixed the vulnerability within 24h, however the plugin never got re-added. It appears to be a case of bureaucracy within the WordPress community.
However, to the credit of the developer, he released again the plugin, free and open source in GitHub and he continues the development and keeps it up-to-date.
Despite the name, this plugin actually retrieves data from a variety of form submissions, including JetPack Contact Form plugin, Gravity Forms plugin, Ninja Forms plugin and more.
It offers a variety of shortcodes that enable you to show and hide columns, to only display data on users with a minimum role, to sort, search and filter columns, and much more. Here is the full list of shortcodes and their uses.
So here is the records of the form submissions with CFDB:
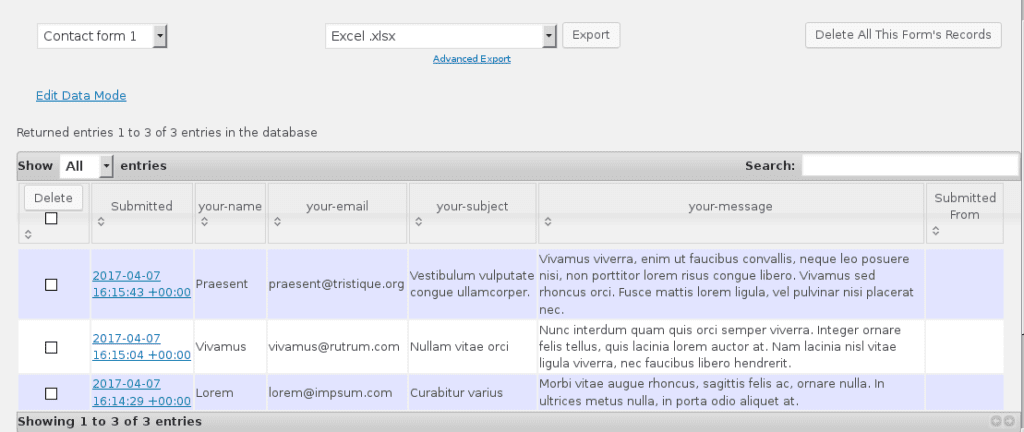
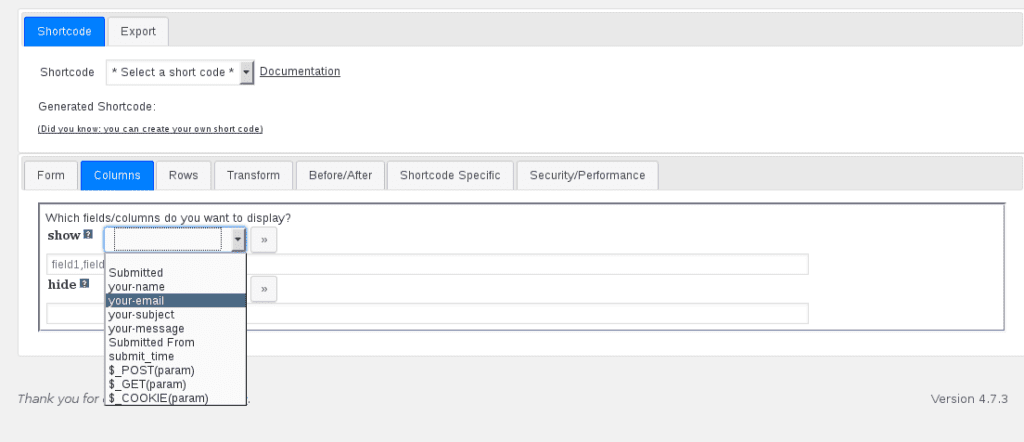
In the above screenshot, at the top of the screen, you can see a simple way to quickly export your data in Excel, or, in one of the other options of the drop-down (including Open Office document, CSV, and more). If you want to only export some fields, you can choose “Advanced Export” and choose the fields you want to show and those that you want to hide:
Getting into detail for all the features of CFDB is beyond the scope of this article. I personally believe that it is a very robust plugin, and that the developer really did a great job in both creating it and offering it for free to WordPress users
Contact Form 7 has earned its place as the go-to contact form plugin for WordPress and this tutorial shows exactly why. It is free, lightweight, and built on the same modular philosophy that makes WordPress itself so powerful.
On its own, CF7 gives you a fully functional contact form in minutes. But the real strength shows when you start layering in the right companion plugins. Akismet and Honeypot keep the spam out without frustrating your real visitors. Flamingo makes sure no submission ever gets lost, even if your mail server has a bad day. Popup Maker turns your form into a seamless experience. And Contact Form 7 Multi-Step Forms lets you handle complex, multi-screen forms without paying for a premium solution.
The pattern across every tip in this guide is the same: identify what you need, find the right free plugin, and connect the pieces. That is the WordPress way, and CF7 embraces it completely.
Whether you are building a simple “contact us” page for a small business or a multi-step lead capture form for a client project, Contact Form 7 can handle it and now you know exactly how to make it do so.